
Basics
As the server evolves, new high-level epic bosses are introduced. To ensure accessibility for all players, low-level bosses are moved into instances, allowing everyone the chance to engage with them.
MasterWork Team presents a battle with the epic boss
 Core Inzone Boss
Lv. 80
Core Inzone Boss
Lv. 80
 in the instance zone.
Gather a group of like-minded people, defeat the boss and receive guaranteed epic jewelry!
in the instance zone.
Gather a group of like-minded people, defeat the boss and receive guaranteed epic jewelry!
Entry conditions and cooldown
-
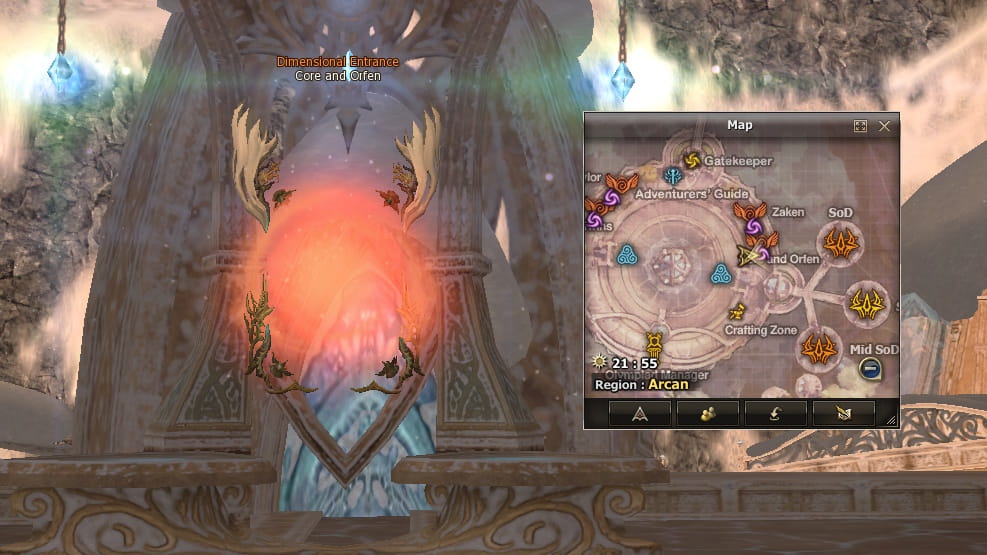
Entrance:
 Core and Orfen Dimensional Entrance
in the Ancient City Arcan
Core and Orfen Dimensional Entrance
in the Ancient City Arcan
- Number of players in a group: 7 - 9
- Player levels: 78 - 85
- Time to complete: 60 minutes. Restart in case of failure is available after complete closure of the zone
- Cooldown: 2 times a week, Wednesday and Saturday
Pay attention!
Bosses Core and Orfen are in the same instance. You can only get to one boss per cooldown.
Related missions
|
Defeat Core/ Orfen Daily
Defeat Core or Orfen to complete this mission.
The entrance to the instance zone is located in Ancient City Arcan. |
 Ivory Coin
NG
Foundation
x100
Ivory Coin
NG
Foundation
x100 Booty from Orfen & Core
Tradable Chest
NG
x1
Booty from Orfen & Core
Tradable Chest
NG
x1 Exp
NG
x15000000
Exp
NG
x15000000 SP
NG
x6000000
SP
NG
x6000000 Fame Point
NG
x250
Fame Point
NG
x250 |
Tactics
Instance map
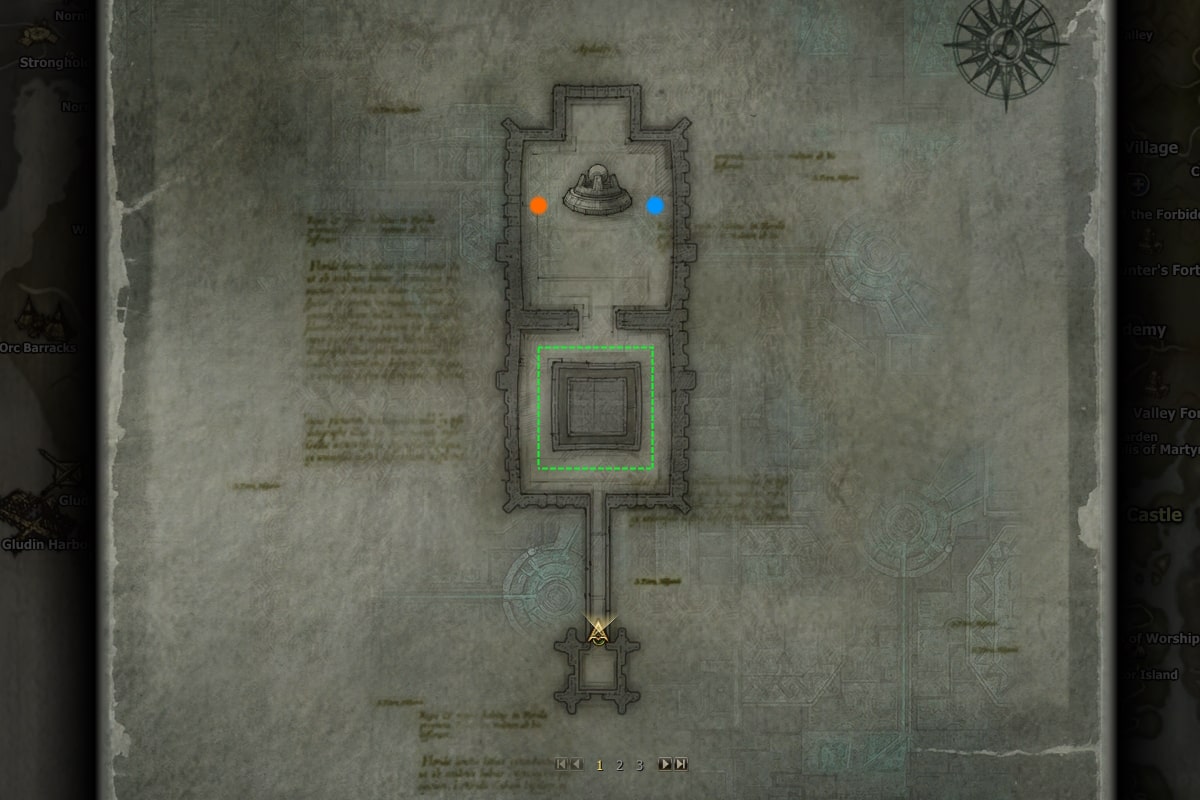
Orange dot — a monster that lowers the Core's physical defense
Blue dot — a monster that lowers the Core's magic defense
After entering the instance, the group appears in a selection room.
To move to the Core, the party leader must talk to NPC
 Yalo To Core
.
Yalo To Core
.

After choosing the boss, the party will be transported to the bridge on the third floor of the Cruma Tower in a
parallel dimension.
At the end of the bridge, you will see a room with monsters. Among the monsters, there is a
 Yalo Key Keeper
Lv. 78
running around in a circle. There are rumours that he can turn into a powerful demon.
But this is not certain. Be prepared for the fact that the monsters are very strong!
Yalo Key Keeper
Lv. 78
running around in a circle. There are rumours that he can turn into a powerful demon.
But this is not certain. Be prepared for the fact that the monsters are very strong!
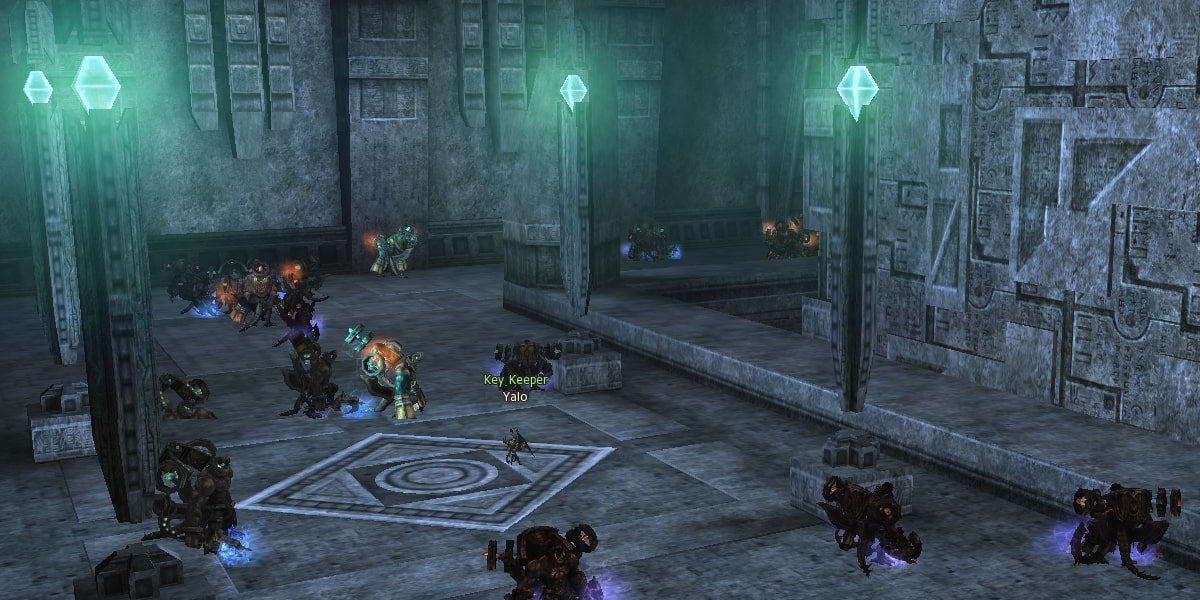
Kill the monsters near the entrance to the room and wait for Yalo to reach you. Use crowd control skills to slow
and kill him. After Yalo dies, the party leader will receive

 Cruma's Secret Key
NG
, which
opens the Boss room.
Cruma's Secret Key
NG
, which
opens the Boss room.
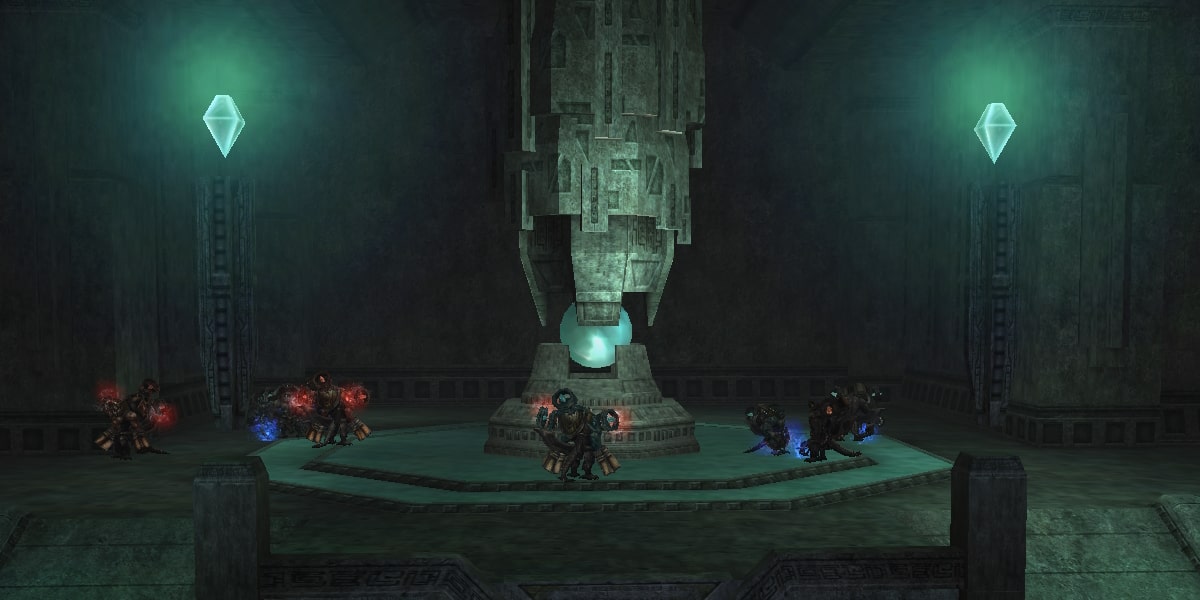
There are two ways to get into the boss room. The first way is to clear the way, killing monsters one after one. The second way is to have the tank gather all the monsters on the way to the door. The group leader opens the room, and the tank leads the monsters into the corner between the columns to the right of the door. The group then kills the monsters with mass abilities.
Pay attention!
Monsters see invisible players. Sneaking around will not work!
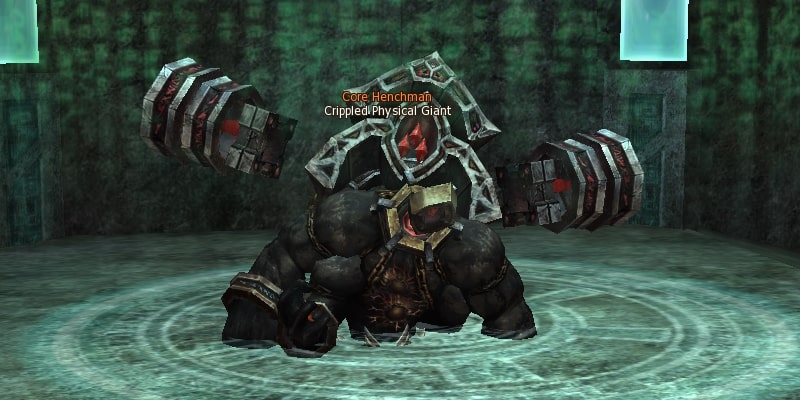
After you've dealt with the monsters and restored your health and mana, you'll have to kill a mini-boss to remove the Core's invulnerability effect and lower its defence.
-
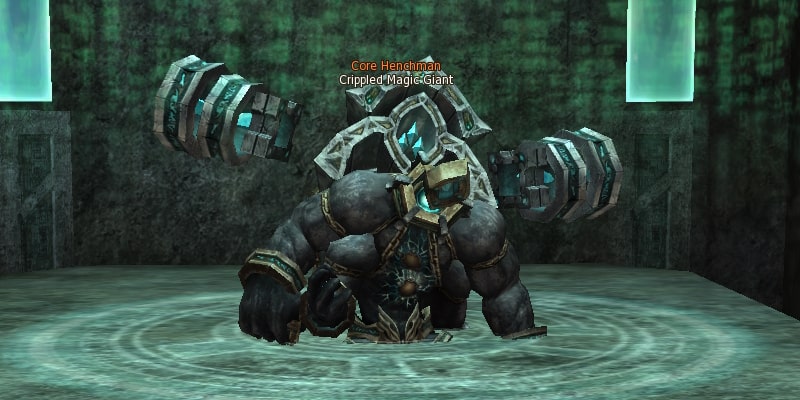
If your group are mages — go to the right side of the room and kill
 Crippled Magic Giant Core Henchman
Lv. 78
Crippled Magic Giant Core Henchman
Lv. 78
-
If your group are warriors — go to the left side of the room and kill
Crippled Physical Giant Core Henchman
Lv. 78
Pay attention!
As soon as you hit one of the monsters, another will disappear. If you try to attack both Minions simultaneously, both will disappear forever. Attack only the monster you need!
Both monsters unleash an area-of-effect ability in the sector directly in front of them. To simplify the fight, we recommend pulling the monster from the platform beneath it rather than from the side of the stairs. The tank should gain the monster's attention and move it to a corner, positioning its back toward the group.
After the Minion dies, the Core loses its invulnerability and receives a permanent debuff that reduces physical or magical defence:


These effects share a common type with some debuffs of similar effect. For example, after killing a Physical
Minion, you will not be able to apply the effect of
 Hex
Lv. 1
to the Core
Hex
Lv. 1
to the Core
After removing the invulnerability, you can attack the boss. At this point, 10 monsters will spawn near the Core — similar to those you encountered in the previous room. Focus on eliminating them first before targeting the boss. The Core is vulnerable to all debuffs, but remember that the boss does not damage players. The primary threat comes from the waves of monsters, so managing them is key to victory.
Pay attention!
Maximum damage to the boss is limited to 35,000 points.
Each time the Core's health decreases by 10%, a new wave of monsters will spawn. How you handle them will depend on your group's strength and coordination. If you’re confident in your abilities, continue attacking the Core while using area-of-effect skills to eliminate the monsters. However, if your group lacks coordination or gear, it’s safer to pause your attack on the Core and focus on defeating the monsters before resuming the fight.
Pay attention!
The aggression of monsters towards individual characters depends on the amount of personal damage inflicted on the boss. Use this knowledge when choosing tactics for killing the boss.
Levelling SA
On the boss, SA is levelled from level 10 to 14. The chance is individual for each group member:
| 10 → 11 | 11 → 12 | 12 → 13 | 13 → 14 | 14 → 15 | 15 → 16 | 16 → 17 | 17 → 18 | |
|---|---|---|---|---|---|---|---|---|
|
Core Inzone Boss
Lv. 80
|
15% | 10% | 7.5% | 5% | 3.5% | 0% | 0% | 0% |
Reward
In the fifth season of MasterWork, drops and experience for completing the instance became personal.
Experience
The experience for killing the Core is fixed for each group member, which means it doesn't matter how many of you there are — 7 or 9, each player will receive the same amount of experience.
Pets gain experience without penalty for the difference in levels between the owner and the pet.
Base experience for killing
Core Inzone Boss
Lv. 80
— 7 000 000 EXP.
Base EXP is multiplied by the fatigue level penalty, bonus from Rune of Experience and buff for achievement.
Personal reward
After the Core dies, each player who was near the boss will receive a box with personal rewards
 Core's Box
NG
. Contents of the box:
Core's Box
NG
. Contents of the box:
-
 Core's Soul Fragment
NG
(2 - 3)
Core's Soul Fragment
NG
(2 - 3)
-
 Chest with Life Stone
NG
(1)
Chance-based
Chest with Life Stone
NG
(1)
Chance-based
-

 Gemstone S
NG
(1 - 2)
Chance-based
Gemstone S
NG
(1 - 2)
Chance-based
-
 Giant's Codex
NG
(1)
Chance-based
Giant's Codex
NG
(1)
Chance-based
-
 Giant's Codex - Mastery
NG
(1)
Chance-based
Giant's Codex - Mastery
NG
(1)
Chance-based
-
 Personal Blessed Scroll of Resurrection
NG
(1)
Chance-based
Personal Blessed Scroll of Resurrection
NG
(1)
Chance-based
-
 Scroll: Enchant Armor (S-Grade)
NG
(1)
Chance-based
Scroll: Enchant Armor (S-Grade)
NG
(1)
Chance-based
-
 Blessed Scroll: Enchant Armor (S-Grade)
NG
(1)
Chance-based
Blessed Scroll: Enchant Armor (S-Grade)
NG
(1)
Chance-based
-
 Scroll: Enchant Weapon (S-Grade)
NG
(1)
Chance-based
Scroll: Enchant Weapon (S-Grade)
NG
(1)
Chance-based
-
 Blessed Scroll: Enchant Weapon (S-Grade)
NG
(1)
Chance-based
Blessed Scroll: Enchant Weapon (S-Grade)
NG
(1)
Chance-based
Pay attention!
15
Core's Soul Fragment
NG
and
 Immortal Ring
Stun Resistance
S
with any effect (obtained from Baylor) can be
exchanged by
Immortal Ring
Stun Resistance
S
with any effect (obtained from Baylor) can be
exchanged by
 Pona Collectioner
in Luxury Shop for the real
Pona Collectioner
in Luxury Shop for the real
 Ring of Core
C
Ring of Core
C
Drop
The drop has been moved to a personal chest
Booty from Orfen & Core
Tradable Chest
NG
,
except epic jewelry —
Ring of Core
C
will drop on the ground, as before.
Contents of the chest
Improved jewelry
The parameters of
Ring of Core
C
can be improved.
For more information on how to get
 Enchanted Ring of Core
B
and
Enchanted Ring of Core
B
and
 Refined Ring of Core
A
, read the article
Pona: Jewelry Upgrade.
Refined Ring of Core
A
, read the article
Pona: Jewelry Upgrade.
Pay attention!
The magical protection of Core jewelry changes as the season progresses. The information in this article is current for the end of the season and the Eternal server.
|
Ring of Core
C
|
M. Def. 60 Max MP +21 Poison Resistance +20% Poison Chance +20% Accuracy +1 Speed +1. |
|
Enchanted Ring of Core
B
|
M. Def. 65 STR +1, INT +1 P. Crit. Rate +15 Resistance to Poison +30% Poison Chance +30% Accuracy +2 Speed +2. |
|
Refined Ring of Core
A
|
M. Def. 70 STR +2, INT +2 P. Crit. Rate +30 Resistance to Poison +40% Poison Chance +40% Accuracy +4 Speed +4. |


 New S-Grade Sets Bonuses
 Masterwork Item Bonuses
 Ingame calendar
 Achievements
 Clan Academy
 Squads Passive Skills
 Clan Active Skills
 Autoloot Agathions MasterWork
 Compound of belts
 MasterWork Olympiad
 Library: Books of Exp
 Dual daggers and blunts
 Judicator - main class. Quest Seeds of Chaos 76+
 Training Olympiad
 Hellbound: Epidos
 Instance-boss Core 78+
 Pets: new skins
 Life Stones on Masterwork
 Cyclic Macros and Assist Manager
 Missions
 Starter quest Eternal
 Crafting cost changes (season 2024)
 Mid Company on Masterwork
 Summoner's Transformations
 Fortresses on Masterwork
 Game event: Hot spot
 Lu4: Fatigue System
 Masterwork Weapon Bonuses
 Kamaloka Hall of the Abyss
 Pailaka — Song of Ice and Fire (35-45)
 Prison (Castle Dungeon) 64+
 Four Sepulchers Instance 74+
 Crystal Caverns aka Baylor 76+
 Frintezza Instance 80+
 Freya. Instance and Epic Boss 82+
 Instance Twins 75+
 Instance Tiat 78+
 Seed of Destruction. Attribute collection 78+
 Blacksmith of Mammon: Weapon Upgrade/Exchange
 Location Keeper Ankou
 Luxury Shop
 Dragon Valley. Lord Ishka
 Beleth on MasterWork
 Lu4: Raid Bosses
 Harbingers of Ankou