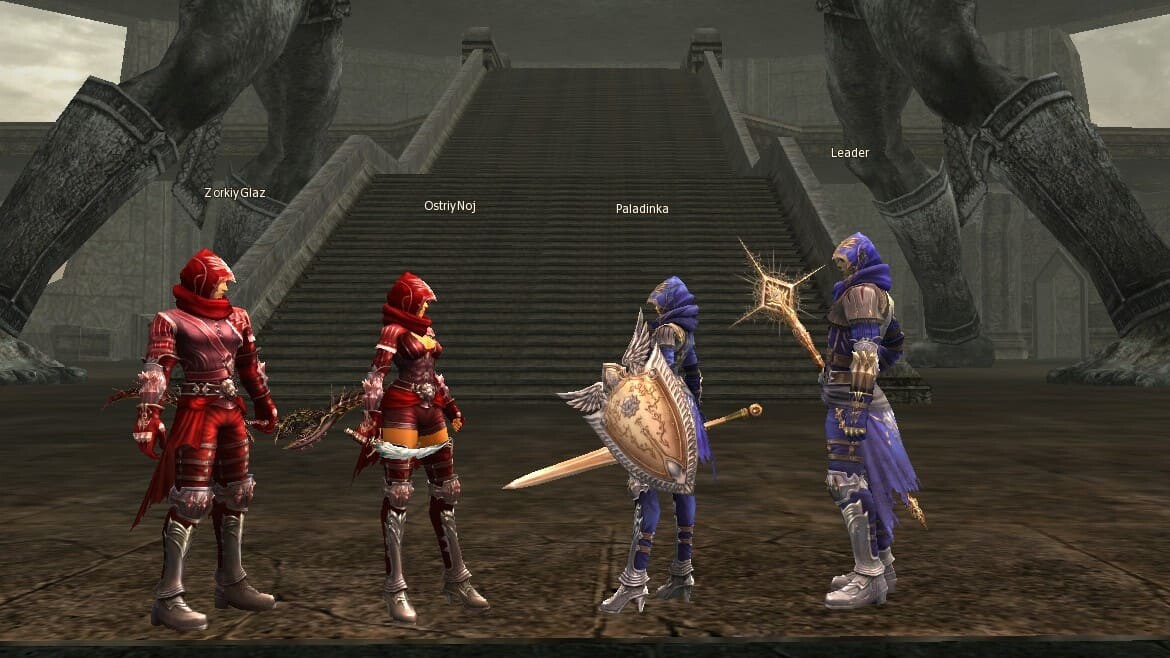
Useful additions to the interface and game
Basics
The MasterWork team has implemented over a hundred improvements and innovations to make the gameplay more comfortable, modern, and convenient for all players. These changes affect all game aspects, from small details to global systems, and together, they significantly improve the overall impression of the game.
The updates were designed with a strong emphasis on community feedback and modern standards for quality and performance. They affected nearly every aspect of the game world, including the interface, client technology, and interactions with characters and the environment.
In this article, we'll take a closer look at the key improvements related to the user interface and functionality of the game client — from entering the game to fine-tuning the client.
Login to the game
Updater
The launch of the game client is available in a special E Global Updater.
Updater features:
- Downloading the game client, as well as a full and fast check of the game files
- Various Updater settings: language, system load, adaptation
- Quick access to your Personal Account, forum, patch notes, radio and MasterWork social networks
- Save and edit game accounts for quick login to a specific character
Language select
In the main menu you can select a language or a combination of languages:
- RU — Russian
- EN — English
- UA — Ukrainian
- CN — Chinese
- ERU — titles in English, descriptions in Russian
- EUA — titles in English, descriptions in Ukrainian
- ECN — titles in English, descriptions in Chinese
The language selected in the main menu does not change the language of the game dialogues. To change the language of the dialogues, reach one of the NPCs in the game:
Login confirmation
When you attempt to log in to an active account, you will receive a notification indicating that the character is online. You will only be able to access the account after confirmation.
Nickname in game window title
The game window title displays the character's nickname for easy selection of the desired window.
Informing
Standardization of descriptions
The description of most skills and items has been standardized to a unified style.
Instead of mysterious "Enhances Strength" inscriptions, the descriptions provide exact percentages or units for all effects.
- Increases mana regeneration → MP Regeneration +8%
- Increases critical damage → Critical Rate +69
- The description of enchanted armor parts displays the HP bonus from enchanting
Standardizing item and skill descriptions makes it easier to choose the right equipment and buffs for your character while reducing the risk of the placebo effect.
System messages
Players can customize system messages. You can edit 122 system messages, as well as customize their display in the system chat and on the screen.
Examples of use:
- Applying the negative effects on the target
- Teleportation time to the Olympiad
- Levelling up SA on a monster or boss
To access the settings, click on the small gear in the system messages window.
The following functions are available in the settings window:
- Message List — select 1 of 122 events
- Color — choose message color
- Chat Message — text in system chat
- Screen Message — text on screen
- Screen Message Options — settings for the location, font and duration of messages on the screen
- GFX Screen Message — text on the screen as a standard notification
- Actions — apply, save, partial and full reset of settings
Split system chat
The system chat is divided into three tabs:
- System — displays all messages
- Damage — information on damage inflicted and received
- Items — information about picked items
By selecting one of the tabs, you will see only messages of the corresponding category.
Bestiary
Bestiary — an interactive compendium featuring detailed information on all monsters and Raid Bosses in the game.
Use the bestiary for detailed information about monsters:
- Appearance of the monster
- Basic characteristics
- Passive skills
- Drop
- Spoil
- SA levelling chance
- Habitat location on the map
You can open Bestiary by clicking on the icon in the target window, the button in the main menu, or pressing the Alt + A key combination.
The Bestiary allows you to search by monster ID or name.
Informative icons
Special icons were added for items and skills, allowing one to navigate through the inventory and skills window.
New icons are available for the following items and skills:
- Weapons with SA with active buff
- Talismans
- Life Stone Skills
- Transformation lvl 80 skills, corresponding to skills of other classes
Skill bar
Auto use of items
Consumables can be used automatically and no longer require a separate slot on the skill bar.
Right-clicking on the icons above the skill panel activates their automatic use.
List of items for auto-use:
-
 Soulshot (S-Grade)
S
Soulshot (S-Grade)
S
-
 Blessed Spiritshot (S-Grade)
S
Blessed Spiritshot (S-Grade)
S
-
 Elixir of CP (S-Grade)
S
Elixir of CP (S-Grade)
S
-
 Elixir of Life (S-Grade)
S
Elixir of Life (S-Grade)
S
-
 Elixir of Mental Strength (S-Grade)
S
Elixir of Mental Strength (S-Grade)
S
-
 Personal Greater CP Potion
NG
Personal Greater CP Potion
NG
-
 Greater CP Potion
NG
Greater CP Potion
NG
-
 CP Potion
NG
CP Potion
NG
-
 Personal Greater Healing Potion
NG
Personal Greater Healing Potion
NG
-
 Energy Stone
NG
Energy Stone
NG
-
 Full Bottle of Souls - 10 Souls
NG
Full Bottle of Souls - 10 Souls
NG
You may choose between equivalent items. Items with a Grade are selected automatically depending on the character's level and the weapon equipped.
Sidebar
Added extra skill panel to improve the management of multiple skills, macros, items, and actions. By default, the additional panel uses the seventh row of the main quick-access skill panel.
All slots on the sidebar function like those on the main bar, except that hotkeys cannot be assigned to the slots of the sidebar.
The sidebar is perfect for placing macros, shadow items, and equipment.
To open a sidebar, click on the icon on the right side of the main bar.
Self-buff automation
An indicator on the icon of certain skills allows you to enable their automatic use by right-clicking.
The "Enable/ Disable Auto-Rebuff in Combat Mode" switch has appeared on the skill panel.
A full description of the mechanics is available in the article Auto-use self-buffs.
Skill panel transparency
It is possible to change the transparency of the skill panel.
To switch modes, click on the small icon on the right side of the skill panel.
Character customization
Cloaks
Cloaks on MasterWork have been reworked — changed the methods of obtaining and bonuses of cloaks, and level restrictions were removed.
You can get a cloak in various ways, including in-game loot and purchases in your Personal Account. Some cloaks are rewarded for assisting the Customer Support Service and the MasterWork Wiki.
Cloaks can be improved: Add CP/HP/MP bonuses and insert Attribute.
More than 25 colours and patterns are available in standard cloaks to customize the appearance of the cloak. In addition, in your Personal Account, you can create a cloak with custom design!
Full information are in the Cloaks on MasterWork article.
Beauty Shop
When creating a character, players use a standard character editor, but later you can visit the Beauty Shop to change the appearance and purchase additional customization items:
- Standard and additional character faces
- Choosing a hairstyle and hair color
- Standard and Legendary Costumes
- Accessories
- Agathions
- Mounts
- Cloaks
- Pet skins
- Emoji for game chat
To open the Shop, click on the icon on the right side menu.
Hide Visuals
All custom visuals of surrounding characters can be turned off.
The function allows seeing the armor worn by the enemy by removing all costumes and accessories.
To change the display of costumes, click on the special icon in the upper left corner of the inventory window.
Locations
The game world and locations have been reworked: The appearance of locations has been updated, the number of monsters has been adjusted, additional bridges and tunnels have been created, and rooms and caves have been expanded.
Changes in the architecture
Many locations, including the arenas of some Epic Bosses, have received architectural changes.
Architecture changes include:
- Expanding Epic Boss Arenas to accommodate larger number of players
- Expanding rooms and caves inside locations for comfortable farming
- New bridges for alternative travel routes
Visual changes
Visual changes have made the locations more comfortable to stay in.
For example, in the Pagan Temple, the awnings have been removed to improve visibility and make navigation of the rooms easier.
Old and new locations
Many new locations of varying levels have been added, while several existing locations have received high-quality updates.
All information about new and changed locations is available in the Wikipedia → Locations.
Monster populations
Almost all locations have significantly increased the number of monsters. That makes previously unpopular locations and spots relevant.
The change gives players a choice: Compete with other players for the most profitable spot or find one of the many slightly less profitable spots with fewer competitors.
Living world
Many locations change their appearance depending on the season and holidays.
In winter, towns are covered in snow, in spring, flowers sprout in them, and an ambience of horror reigns during Halloween.
Bugs fixed
Repair work has been carried out throughout the game world — many geo data errors and character gaps in textures have been fixed.
Easter eggs
Exploration of the world becomes much more interesting. Dozens of little secrets are hidden throughout the game world.
Character
Movement
Character control was improved. Collision has been removed — other characters and NPCs do not interfere with movement.
The WASD system with all movement options has been completely reworked.
Added the ability to move by simultaneously holding the left and right mouse buttons (LMB + RMB). The character will move in the camera direction, which can rotate.
If you don't like or are bothered by the ability to move in this way, you can turn it off in the game settings:
(General Menu (Alt + X) → Options → Configure → Mouse click to move
Rotate the camera 180 degrees
Added the function of rotating the camera when pressing the mouse wheel.
To enable the function, check the box in the game settings:
General Menu (Alt + X) → Options → Configure → 180-degree turn
Combat Mode
 Combat Mode
— allows you to attack the target with skills and auto-attack without pressing the Ctrl key.
/combatmode
Combat Mode
— allows you to attack the target with skills and auto-attack without pressing the Ctrl key.
/combatmode
Targeting an enemy in PvP
When you take damage in PvP, a trigger will appear near the screen, which targets the character who attacked you.
Target
Pointing over a monster's HP bar displays its health points.
There are two additional icons below the target window to open the selected monster's page in the Bestiary and activate the widget with the monster's drop and spoil.
When you target another player, you will see the profession of the selected target.
Right-click on your nickname or the nickname of a player in the target window, opens an additional menu of quick actions:
On self:
- Sell
- Package Sale
- Buy
- General Workshop
- Instance zone name — window displaying cooldown of instance zones
- Dwarven Workshop — available to Dwarven professions
On other player:
- Assist — available to party members
- Whisper
- Exchange
- Add to friends
- Invite to party
- Invite to clan — available to clan members with invite privilege
- Dismiss party member — available to party leader
- Change party leader — available to party leader
- Leave party — available to party members
Next target
The options for selecting the next and previous target have been expanded:
-
 Next Target Near — Selects the next target within 600 radius. /targetnext
-
 Previous Target Near — Selects the previous target within 600 radius. /targetprev
-
 Next Target Long Distance — Select the next target within 900 radius. /targetnext2
-
 Previous Target Long Distance — Selects the previous target within 900 radius. /targetprev2
Social actions
Added several new social actions:
-
 Jump — The character jumps, but cannot jump onto obstacles.
-
 Disapprove — Decreases the reputation of the selected player.
Session statistics
An additional window in the interface that displays data from the current game session.
The session statistics window displays:
- Number of PvP
- PvE damage
- PvP damage
Two control buttons available in the session statistics window:
- Refresh — refreshes information, statistics are not updated automatically
- Initialize — resets all counter values
To display the statistics window, press the new button on the radar or in the statistics window (Alt + T). Exiting the game resets the statistics.
Party
Group Leader Deputy
Added the ability to appoint a party leader deputy. The deputy can invite and dismiss party members. Only the party leader can appoint a deputy.
To appoint a deputy, click on the corresponding button in the action menu (Alt + C), or use the command /subleaderset
Buff display
A whole line of buffs for party members takes up a lot of screen space, and unnecessary effects are distracting. The Masterwork team fixed that issue
The new Party Settings feature allows you to display specific effects for party members to track their presence and duration. We've compiled a list of effects commonly tracked during party play.
Similar effects merged into groups for ease of customization. The remaining time of the effect is shown after hovering the cursor over the icon. For example:
When you select the
![]() icon, the party will display effects of this type:
icon, the party will display effects of this type:


 Noblesse Blessing
Lv. 1
—
effect tracking was added directly to the party window.
The effect icon is opposite the party member's nickname.
Its status makes it easy to determine whether the character has a buff.
Noblesse Blessing
Lv. 1
—
effect tracking was added directly to the party window.
The effect icon is opposite the party member's nickname.
Its status makes it easy to determine whether the character has a buff.
The displayed buffs can be customized with a colour indicator of the remaining duration. Four colours are available, each of which can be assigned a time limit.
Party ping
The "Party Ping" feature was developed to streamline party coordination for basic actions such as teleporting, entering an instance on command, or applying buffs before a battle. Only the party leader can initiate the check.
To Ping, click on the corresponding button in the action menu (Alt + C), or use the command /partyping
After pressing an action button or using a command, a status window for the party members appears on the party leader's screen.
Click the "Ping" button to check the party's readiness. A confirmation window will appear on the party members' screen.
 Green — the player responded positively
 Red — the player responded negatively or did not respond before the end of the request
 Gray — the player has not yet responded
Landmark
The "Party Landmark" feature is designed to simplify repartying at a designated location. Instead of giving lengthy instructions, the party leader can place a clear, visible marker to guide the team efficiently.
To place a Landmark, click on one of the corresponding buttons in the action menu (Alt + C), or use the command:
-
 Party Landmark: Red
— To place red Landmark /partymark
Party Landmark: Red
— To place red Landmark /partymark
-
 Party Landmark: Green
— To place green Landmark /partymark2
Party Landmark: Green
— To place green Landmark /partymark2
Landmarks can be placed on the quick access skill bar.
A highlighted area will appear under the cursor after pressing the action button or using a command. Move the cursor to the desired location and click on the ground — all party members will then see a bright, visible marker.
The Command Channel Leader can set two more markers — yellow and purple. More details are in the Clan section.
Party highlight
Added "Party highlight" function for easy party members tracking in battle.
To turn the highlight on or off in the party window, click the "Group Settings" button and activate the corresponding function. To set up the highlight, click the icon on the right side of the party settings window.
In the backlight settings, you can choose a single style or fine-tune it for different roles in the party. Customization options include:
- 7 roles in the party depending on the class, including the individual role of the party leader
- 9 backlight patterns including no backlight for a certain role
- 16.7 million colors in RGB color model
Group name colour
You can choose to display the colour of your party members' names to track the status of your party members. To do this, open the party settings menu and select the desired mode:
- White/PvP/PK
- Colored/PvP/PK
- White names
Tokens
For convenience in battle, players have access to 16 different tokens. Two different tokens can be set for one target simultaneously.
To install a token, click on the corresponding buttons in the action menu (Alt + C) or use commands like /usetoken1
To select a target with a set token, use the corresponding buttons in the action menu or commands like /targertoken1
Tokens can be placed on the quick access bar.
Resurrected party member
A visual indicator was added to improve coordination within the party. It shows dead party members who have received a Resurrection offer but have not yet accepted it.
A green highlight on a character in the party window means that this character has already received a Resurrection offer from another player.
Party Matching
Finding teammates to farm with or run an instance is easier when using Party Matching. Click the party icon in the lower left corner to open the search menu.
The party search menu shows available groups to join. Check out the party title, required levels, and number of people in the party.
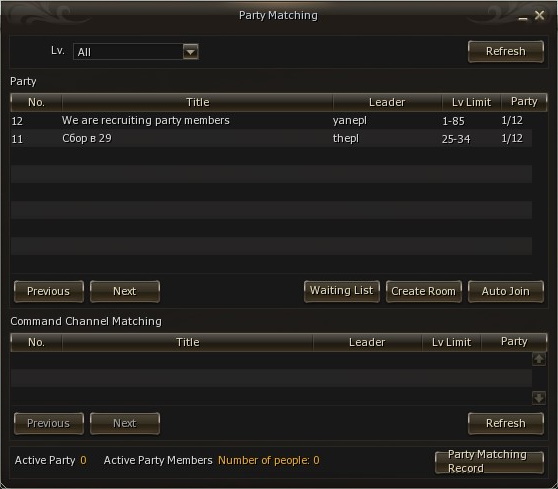
Once you find a suitable party, double-click on the desired line to join the waiting room. The party leader will decide whether to invite you to the party.

If you can't find a suitable party, create your own. To do this, on the main party search page, click "Create", then specify the name, the number of participants and the levels required to join.

To avoid waiting for suitable players to find a party, use the list of players looking for a party and invite them to yours. If necessary, use the role filter.

Once the party is assembled, click the Exit button to close the party room.
Pay attention!
The number of participants in the party room increased to 15 characters.
Auto invite and Auto trade
Simplified interaction between characters running in windows on the same device.
The character in your additional window automatically accepts your invitation to the group and trade request.
Clan
Looking for a clan
Team up with other players by joining a clan. The new Clan Search tool makes finding the right clan easier than ever. Click the "Join Clan" icon in the lower-left corner to open the search menu.
The window that opens shows a list of clans that are actively recruiting players. At the top of the menu are filters and a search by clan name or leader name. The main page provides information:
- Clan name
- Leader name
- Clan level
- Number of participants
- Clan profile
- Recruiting method
When you select a clan, a window with additional information about the clan opens on the right side.
To join, click on the clan you like in the list, then click the "Entry Application" button in the right window.
The "Public" recruitment method means that you will join the clan or academy immediately after pressing the button. For other recruitment methods, your application will be reviewed by the clan leader before you're accepted.
At the bottom of the menu there are buttons:
- Refresh
- My application
- Waiting List
Click the "My Application" button to view your submitted applications and cancel any if needed.
The "Waiting List" button opens a waiting room, similar to the group search. In the search room, you can register in the queue to join the clan by creating an application using a form. Clan leaders can view open applications and invite registered members to their clans.
Creating a clan recruitment request
The clan leader can create a recruitment announcement to quickly and easily attract new members to the clan or academy.
- Open the search system window (Clan Entry)
- Click the “Register Clan” button
- Select the conditions for recruitment to the clan and specify additional conditions in the text field
- Click the “Complete” button to place your ad
You can edit or delete your recruitment ad at any time. After deleting an ad, you must wait 5 minutes before posting a new one.
If you choose the "No Application" (Public) option, then players will join your clan automatically.
Selecting the "with application" option (Allow): when a candidate applies, the "Waiting list" button will appear at the bottom of the system window. Click it to view all submitted applications.
Click on the candidate's name to read the application text and decide whether to accept him/her into the clan. Also, you can go to private messages with the applicant in the chat, or write a letter via game mail.
In addition to posting a recruitment announcement, the clan leader can also search for and invite players who are “passively” looking for a clan.
To do this, open the search system window and click the “Waiting List” button.
The “Waiting List” window displays all players who have applied to join your clan.
You can contact applicants directly through private chat or in-game mail using the corresponding buttons.
To make it easier to find the players you need, you can use filters by level, specialization, and character name.
Simultaneous recruitment to the clan and the academy is not available. The clan leader must choose the recruitment method.
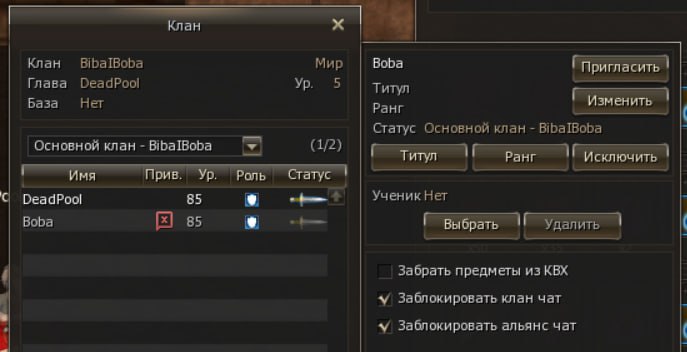
Additional privileges
Clan leaders can grant or restrict access to clan and alliance chat and manage full access to the clan warehouse. Locate the character in the clan menu and apply the desired settings to adjust these permissions.
Key features of the Command Channel
The Command Channel Leader has access to information about key skills in all groups in the Command Channel.
To view the information, open the Command Channel window and click the "Skills" button. An additional window will appear, where the skills will be displayed, divided into 9 categories:
- Symbol of Noise
- Mass Resurrection
- Day of Doom
- Purification Field
- Alliance Flames of Invincibility
- Sublime Self-Sacrifice
- Fusions
- Shield of Faith & Protection Instinct
- Aura Blast & Multiple Shot


Landmark for the command channel
The command channel leader can use 2 additional tags displayed to the entire command channel. Tags work similarly to group tags. Only the leader of the command channel can set a tag.
To place a landmark, click on one of the corresponding buttons in the action menu (Alt + C) or use the command:
-
 CC Landmark: Yellow
— To place a yellow landmark /mpccmark
CC Landmark: Yellow
— To place a yellow landmark /mpccmark
-
 CC Landmark: Purple
— To place a purple landmark /mpccmark2
CC Landmark: Purple
— To place a purple landmark /mpccmark2
Landmarks can be used from the quick-access bar.
After pressing the action button or using a command, a highlighted area will appear under your cursor. Move the cursor to the desired location and click on the ground. The bright mark will be visible to all members of the command channel.
Group leaders can set their tags independently of the CC leader's tags. The CC leader can set up to 4 tags at a time.
Command channel ping
Added "Readiness Check" (Ping) feature for the command channel, equal to the similar party function. Only the CC leader can start the check.
After pressing the button, the CC group status window appears on the CC leader's screen.
To start the readiness check, click the "Ping" button. Only group leaders can confirm readiness.
War statistics
The leader of the command channel has access to the kill and death statistics for each group. Both group statistics and overall statistics are displayed in the command channel window.
All clan members have access to statistics of previous battles with other clans. The statistics display the number of killed enemies and defeated allies. To view, click on the statistics button in the clan window.
The clan war window must remain open to track the statistics. For convenience, you can minimize the window without closing it.
Inventory
Store window
There are two modes of displaying products in the store — lists and icons. Click on the small button at the top of the shop window to change the display mode.
List of all recipes
Added a function to view all recipes and resources required for crafting these recipes.
To view recipes, press the corresponding button in the action menu (Alt + C), or use the command /recipelist
Material crafting
Mass crafting of materials is available without mana costs, but you have to pay for that. Re-crafting without quantity limitation is available to NPC blacksmiths:
-
 Pushkin Master Blacksmith
in the Blacksmith Shop and in Giran main square
Pushkin Master Blacksmith
in the Blacksmith Shop and in Giran main square
-
Pushpaw Blacksmith
in the Blacksmith Shop of the Ancient City Arcan
Items
 Superior-Grade Life Stone NG
Superior-Grade Life Stone NG
Superior-Grade Life Stone NG
Superior-Grade Life Stone NG
Superior-Grade Life Stone NG
Superior-Grade Life Stone NG
Superior-Grade Life Stone NG
 Accessory Life Stone - Ring NG
 Accessory Life Stone - Earring NG
 Accessory Life Stone - Necklace NG
 Gemstone D NG
 Gemstone C NG
 Gemstone B NG
 Gemstone A NG
Gemstone A NG
Gemstone A NG
 Gemstone S NG
Gemstone S NG
Gemstone S NG
 Crystal (B-Grade) B
 Crystal (A-Grade) A
 Crystal (S-Grade) S
 Braided Hemp NG
 Cokes NG
 Leather NG
 Cord NG
(x20)
Cord NG
(x20)
 Metallic Fiber NG
(x20)
Metallic Thread NG
Metallic Fiber NG
(x20)
Metallic Thread NG
 Metal Hardener NG
 High-Grade Suede NG
 Compound Braid NG
 Steel NG
 Coarse Bone Powder NG
 Varnish of Purity NG
 Synthetic Cokes NG
 Crafted Leather NG
 Durable Metal Plate NG
 Mithril Alloy NG
 Oriharukon NG
 Steel Mold NG
 Silver Mold NG
 Artisan's Frame NG
 Blacksmith's Frame NG
Craftsman Mold NG
Maestro Mold NG
Blacksmith's Frame NG
Craftsman Mold NG
Maestro Mold NG
 Maestro Anvil Lock NG
 Maestro Holder NG
Reorin's Mold NG
Warsmith's Mold NG
Arcsmith's Anvil NG
Warsmith's Holder NG
Superior-Grade Life Stone NG
Maestro Holder NG
Reorin's Mold NG
Warsmith's Mold NG
Arcsmith's Anvil NG
Warsmith's Holder NG
Superior-Grade Life Stone NG
Required
 Adena NG
(x250,000)
Adena NG
(x250,000)
 Top-Grade Life Stone NG
(x10)
Top-Grade Life Stone NG
(x10)


Items
Superior-Grade Life Stone NG
Superior-Grade Life Stone NG
Superior-Grade Life Stone NG
Superior-Grade Life Stone NG
Accessory Life Stone - Ring NG
Accessory Life Stone - Earring NG
Accessory Life Stone - Necklace NG
Gemstone D NG
Gemstone C NG
Gemstone B NG
Gemstone A NG
Gemstone A NG
Gemstone S NG
Gemstone S NG
Crystal (B-Grade) B
Crystal (A-Grade) A
Crystal (S-Grade) S
Braided Hemp NG
Cokes NG
Leather NG
Cord NG
(x20)
Metallic Fiber NG
(x20)
Metallic Thread NG
Metal Hardener NG
High-Grade Suede NG
Compound Braid NG
Steel NG
Coarse Bone Powder NG
Varnish of Purity NG
Synthetic Cokes NG
Crafted Leather NG
Durable Metal Plate NG
Mithril Alloy NG
Oriharukon NG
Steel Mold NG
Silver Mold NG
Artisan's Frame NG
Blacksmith's Frame NG
Craftsman Mold NG
Maestro Mold NG
Maestro Anvil Lock NG
Maestro Holder NG
Reorin's Mold NG
Warsmith's Mold NG
Arcsmith's Anvil NG
Warsmith's Holder NG
Superior-Grade Life Stone NG
Required
Adena NG
(x250,000)
Top-Grade Life Stone NG
(x10)
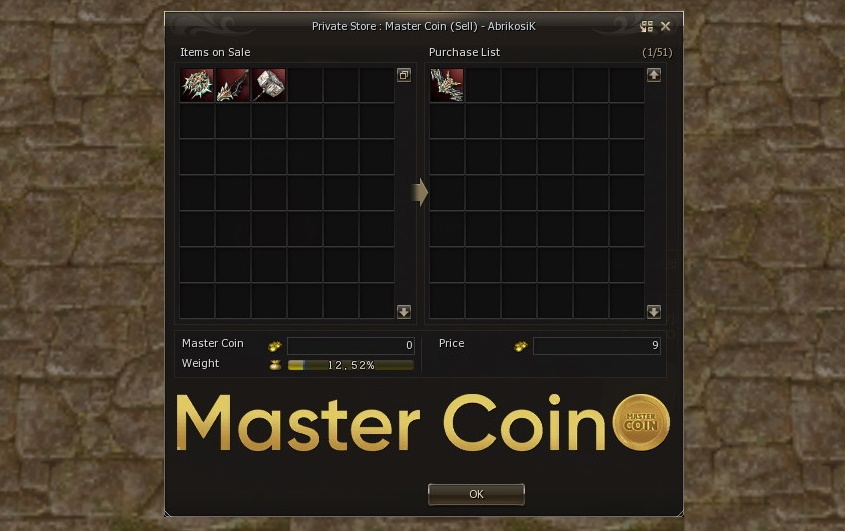
Private store and Master Coin
During the game, you may often find yourself selling an item for Adena to buy Master Coins, or vice versa — selling Master Coins to purchase equipment or materials from the market.
The Masterwork team has freed players from unnecessary actions. Now, you can choose a currency for the private store. For convenient trading, we created a separate area in Giran Square next to the Newbie Guide, where you can use Master Coin for automatic transactions.
In addition, the merchant models have been replaced with simpler ones to reduce the video card load when there are many players.
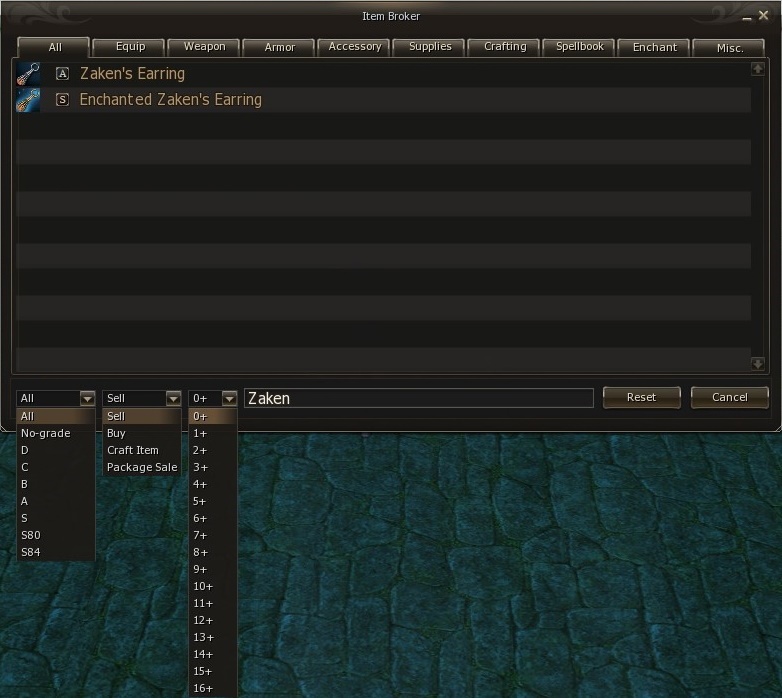
Item broker
We believe in a lively and dynamic market. That is why you won’t find the typical Item Broker telling you who’s selling what and at what price. However, running all over Giran to find a specific item, like Soul Shots, before heading to Kamaloka can be quite a hassle.
The Masterwork servers have an automatic product search system. In general, this is a familiar Item Broker, the interface of which can be opened in any city. With its help, you will find out who, what and where is selling, but you will not find the price. Such settings allow you to maintain healthy market competition.
Finding the Broker Item is easy — it's always with you! Open the action menu (Alt + C) and find the pink icon. Also available by command /finditem
When entering a city, a blinking Item Broker trigger will appear on your screen. You can move or disable this trigger through the E Global settings.
The Item Broker menu is a panel with tabs for various categories of goods— equipment, accessories, materials, and more. Select the desired category to view a list of available product offers.
When you open the product menu, stores in the city that sell the item you're looking for will be automatically highlighted. The menu will also display the sellers' character names and the quantity of items available. Selecting a merchant from the menu will automatically target them and display an arrow above your character pointing toward the seller's location.
To help you find the most suitable item, the Item Broker offers filters by grade, sale type, and enchantment level. You can also use the search bar to enter the item's name and locate it instantly, without scrolling through the full product list.


Inventory expand
The limit of character Inventory slots increased from 164 to 220.
On Masterwork servers, you can expand your inventory slot limit. The following expansion options are currently available:
-

 Expand Inventory
+60
NG
, +60 slots
Expand Inventory
+60
NG
, +60 slots
-
 VIP level: +10/ +20/ +30/ +40 slots
-
 Pioneers Ring
NG
+10 slots
Pioneers Ring
NG
+10 slots
-
 Greater MW Ring
NG
+15 slots
Greater MW Ring
NG
+15 slots
-
 Blessed MW Ring
NG
+20 slots
Blessed MW Ring
NG
+20 slots
-
 Lidia’s Necklace
NG
+10 slots
Lidia’s Necklace
NG
+10 slots
-
 Lidia’s Earing
NG
+7 slots
Lidia’s Earing
NG
+7 slots
-
 Lidia’s Ring
NG
+5 slots
Lidia’s Ring
NG
+5 slots
In addition to the inventory slots extension, other extensions are available:
-
 Expand Storage
+100
NG
+100 warehouse slots
Expand Storage
+100
NG
+100 warehouse slots
-
 Expand Mail, Store and Manufacture
+8
NG
+8 slots for the private store, game mail and dwarven workshop
Expand Mail, Store and Manufacture
+8
NG
+8 slots for the private store, game mail and dwarven workshop
-
 Expand Dwarven Craft
+48
NG
+48 slots in the recipe book for dwarves
Expand Dwarven Craft
+48
NG
+48 slots in the recipe book for dwarves
Full details are available in the article Slots Expansion and Weight Limit.
Augmentation
Life Stone insertion (augmentation) is available from the inventory window.
Detailed information about Life Stones is available in the article Life Stones on MasterWork.
Talisman merge
Identical talismans combine into one slot by pressing a special button in the inventory window. In this case, the duration of all items summing in the combined talisman.
Detailed information about Talismans is available in the article Talismans on MasterWork.
Attribute insertion
No more inserting attribute stones and crystals one by one. Click on the attribute, select the number of stones, confirm and pray to the gods of random.
Full information about the attribute is available in the article Attribute System.
Compound of Belts
Belts are compounded directly in the character's inventory window.
All information about belts is available in the article Compound of Belts.
Quick interaction with the warehouse
Now, when operating with the warehouse, you can use two new functions: "Move all to warehouse" (arrow symbol to the right) and "Move all to inventory" (arrow symbol to the left). Sorting by tabs works similarly.
Pay attention!
Adena
NG
,
 Ancient Adena
NG
,
Ancient Adena
NG
,
 Master Coin
NG
and
Master Coin
NG
and
 Ivory Coin
NG
are not transferred automatically.
Ivory Coin
NG
are not transferred automatically.
Inventory search
A new function is available to quickly find the necessary item in the inventory — item search.
Click the icon in the upper-right corner of your inventory and enter the name of the item you are looking for. The search works with partial entries — you don’t need to type the whole word.
Quick sell
You can now sell items directly from your character's inventory to a regular store. No need to travel to a city or search for NPC merchants.
To sell, drag unwanted items to an icon in the lower right corner of the inventory, specify the quantity and receive adena. Items will be sold instead of deleted. Dwarves have the choice of "Crystallization" or "Sale".
Menu and Settings
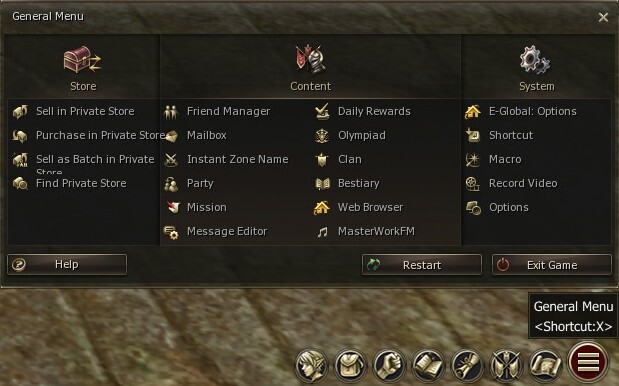
General Menu
Many new MasterWork features have been added to the General Menu for quick and easy access.
Store functions are on the left side:
- Sell in Private Store
- Purchase in Private Store
- Sell as Batch in Private Store
- Find Private Store
The central part contains the main information (Content):
- Friend Manager
- Mailbox
- Instant Zone Name
- Party
- Mission
- Message Editor
- Daily Rewards
- Olympiad
- Clan
- Bestiary
- Web Browser
- MasterWorkFM
On the right side there are system settings (System):
- E-Global: Options
- Shortcut
- Macro
- Record Video
- Options
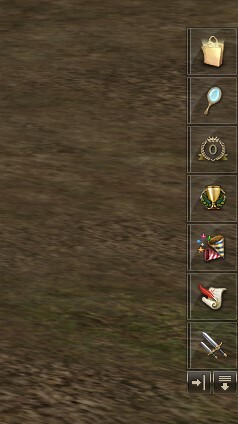
Side menu
On the right side of the screen, there is a side menu with quick access to useful functions:
- L2 Store — Shop for goods for Adena and Master Coin. You can buy goods outside the city
- Beauty Shop
- VIP Level
- Achievements
- Daily Rewards
- Missions
- Assist Manager
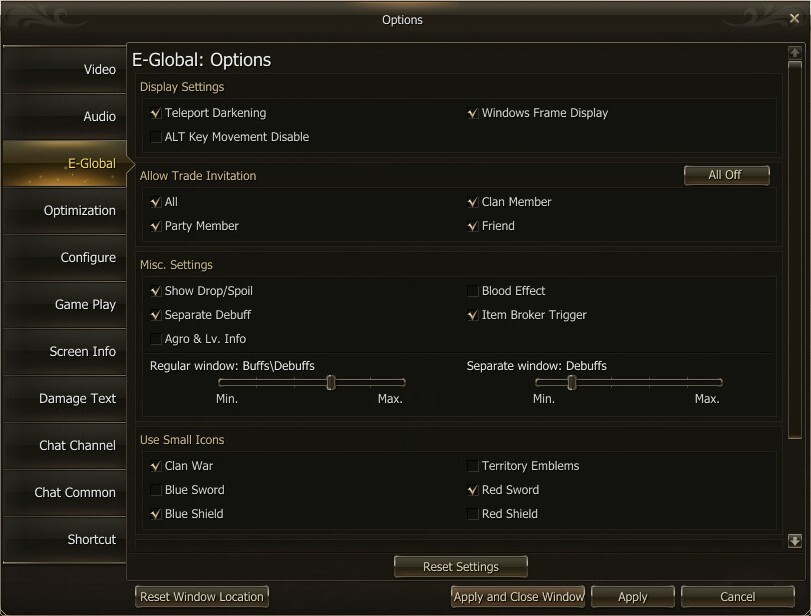
E-Global: Options
A dedicated MasterWork menu allows players to fine-tune game interactions and on-screen information to suit their preferences.
Display Settings
Advanced image settings not initially available in the base game:
- Teleport Darkening
- ALT key Movement Disable
- Windows Frame Display
Pay attention!
After changing graphics settings, you must restart the game client for the new settings to apply.
Allow Trade Invitation
The limiting trade requests function will allow you to protect yourself from players who interfere during important PvP events with frequent trade offers. Specify in the settings who can offer you a trade:
- All
- Party Member
- Clan Member
- Friend
Misc. Settings
Flexible configuration of information on the screen:
- Drop and spoil from the selected monster (Show Drop/ Spoil)
- Mob level and aggressiveness (Agro & Lv. Info)
- Blood Effect when HP is critically low (Blood Effect)
- Item Broker icon in city trade zones (Item Broker Trigger)
- Display debuffs in a separate line (Separate Debuff)
- Adjusting the size of buff and debuff icons
Use Small Icons
Small icons above characters' heads make mass PvP events more manageable and visually clear. They help you better navigate the terrain and keep an eye on the entire battlefield. You can choose which categories of characters will display small icons:
- Clan War
- Territory Emblems
- Blue Sword — for attacking allies during sieges (Blue Sword)
- Red Sword — for attacking enemies during sieges (Red Sword)
- Blue Shield — for defending allies during sieges (Blue Shield)
- Red Shield — for defending enemies during sieges (Red Shield)
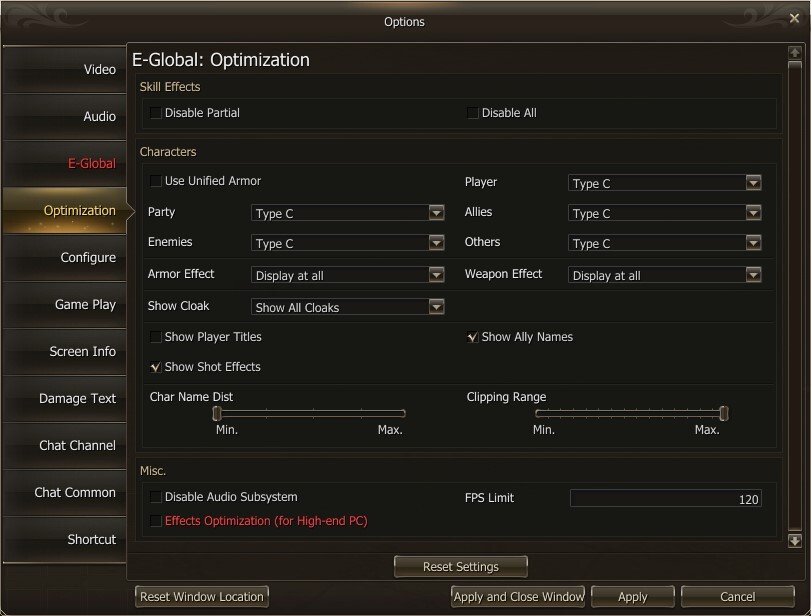
E-Global Optimisation
MasterWork optimization settings let you enjoy smooth gameplay even on low-end PCs or laptops. Players with powerful machines will also benefit — higher FPS during large-scale battles involving thousands of players can be a crucial advantage on the path to victory.
Skill Effects
Adjusting the visual effects of skills will significantly reduce the system load and improve performance. Select the desired settings at the top of the menu:
- Disable Partial
- Disable All
Pay attention!
"Fusion" skills are displayed regardless of the selected settings.
Characters
A unified armor for all characters significantly reduces your PC or laptop load. Displaying the same armor for surrounding players requires fewer resources, improving overall performance. Choose one of six armor options in the settings to display in each character category.
- Player
- Party
- Allies
- Enemies
- Other
This section also includes additional settings for character visual display. For each category, you can choose from three options: disable display completely, enable it only for your character, or enable it for all characters. Available categories include:
- Armor Effect
- Weapon Effect
- Show Cloak
Below are additional display settings:
- Show Ally Names
- Show Player Titles
- Show Shot Effects
- Char Name Dist
- Clipping Range
Mics
At the bottom of the menu are other optimization options:
- FPS Limit
- Disable Audio Subsystem — Disabling the audio interface. Recommended for low-performance systems.
- Effects Optimization — CPU load for client optimization. Not recommended for low-performance systems.
Radio and Browser
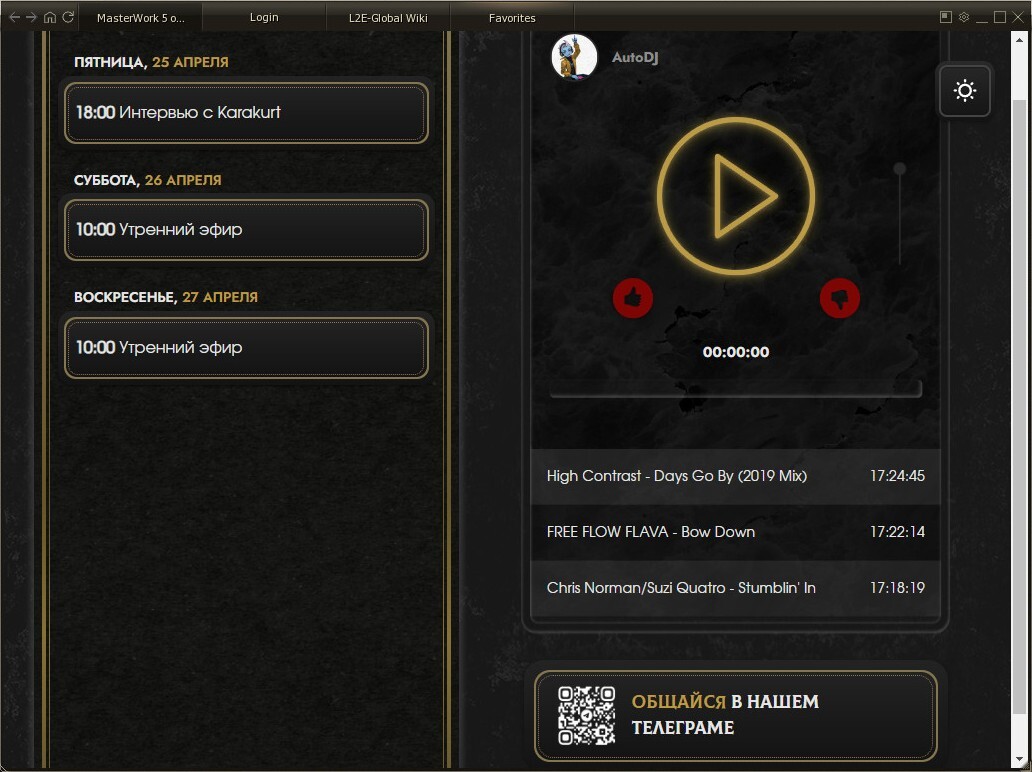
MasterWorkFM
Welcome to MasterWorkFM!
To share news, stories, and good vibes, we’ve launched our very own radio! Tune in to MasterWorkFM broadcasts both in-game and outside the game — stay connected wherever you are.
On MasterWorkFM you will find:
- Podcasts with players and administration
- Gaming world news summaries
- Patch notes discussions
- Entertaining events and quizzes
There are four ways to turn on the radio:
- Press the MasterWorkFM button in the main menu
- Press Ctrl + R hotkeys
- Join the broadcast in the Telegram channel MasterWorkFM
- Go to the MasterWork website using a regular or in-game browser, then select the Radio section in the main menu
The radio player window features a “Podcast Schedule” button. Click it to open the radio page in the in-game browser, where you can view the upcoming week’s podcast schedule and see a list of the most recently played tracks.
Want to ask a question, share your opinion, or suggest a guest for the podcast? Contact our RJ Ephas on Telegram.

In-Game Browser
In-game browser — everything important at your fingertips!
To access information, you no longer need to minimize the game. We have added a built-in browser where you can:
- Check out the latest patch notes
- Chat on the forum
- Use the Personal Account services
- Read guides on Wikipedia
- Watch videos on various platforms
- And much more
You can open the browser by clicking on the corresponding button in the main menu or by pressing the Alt + B key combination.
Other
Quick optimization and wall-hack
Clicking the mouse wheel disables all skill and effect animations, greatly boosting FPS performance.
Pressing the wheel again will activate the wall-hack mode, allowing you to avoid danger or track down victims.
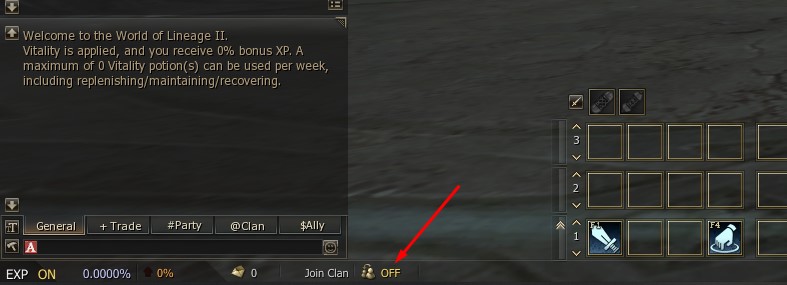
Stop exp
Pressing the button in the lower-left corner of the screen disables the experience gained, which will allow you to stop the character's development at a certain level.

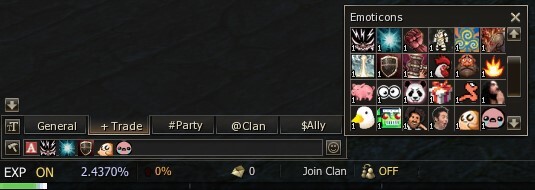
Emoji
Spice up your communication with other players using emojis in the game chat.
Emoji can be bought from NPC
 Rylai Battle Pass Manager
and obtained for
Achievements.
Rylai Battle Pass Manager
and obtained for
Achievements.
Sorting Macros
All macros can be freely moved within the macro settings window, which makes it easy to sort them and maintain order even with a large number of macros.
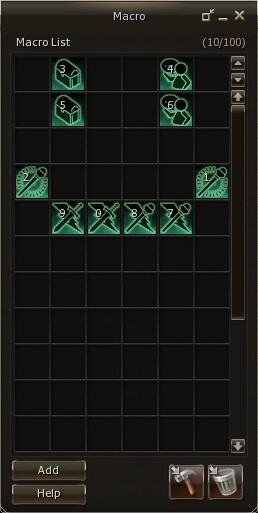
Mini windows of macro and personal teleport
The Macro and Personal Teleport windows can be resized, allowing you to use them as an additional skill bar for quick access and convenience.
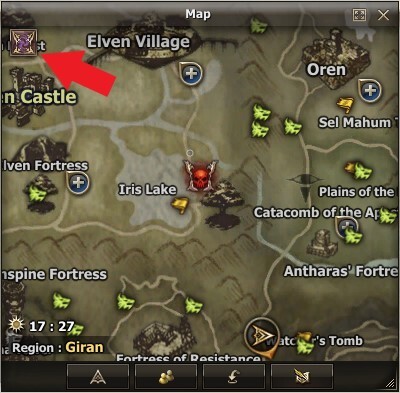
Active Hot Spot
Clicking on the special button in the upper left corner of the mini-map will show the active Hot Spot.
Useful commands
- trade — /trade /tr
- olympiadstat — /olympiadstat /o
- target — /target /t
- targetnext — /targetnext /tn
- assist — /assist /ass
- attackforce — /attackforce /af
- attackstand — /attackstand /as
- useskill — /useskill /us
- useskillforce — /useskillforce /usf
- useskillstand — /useskillstand /uss
- useshortcut — /useshortcut /usc
- useshortcutforce — /useshortcutforce /uscf
- useshortcutstand — /useshortcutstand /uscs
- channelinvite — /channelinvite /cc
- friendinvite — /addfriend /fi
- partyinvite — /invite /in
- leaderchange — /changepartyleader /cpl
- partydismiss — /dismiss /d
- petattack — /petattack /pa
- usepetskill — /usepetskills /upts
- petrevert — /petrevert /ptr
- summonattack — /summonattack /sa
- usesummonskill — /useservitorskills /uservs
.visualequip off and .visualequip on — enable/disable costumes


